Categories
Education Fun & Entertainment How-To Guides Linux Mac Photoshop Tips and Tricks Windows

How to Rasterize Layers in Photoshop ?

I guess, you might have seen rasterization error in the Adobe Photoshop.

Well, it says, The pixels in a type layer cannot be edited with out first rasterizing the layer or can not complete request due to pixels in the layer type is not able to be edited without earlier rasterizing the layer, as shown in the below figure,

How to Rasterize a Layer in Photoshop?

It was displayed due to the reason that you tried to use the filters or the painting tools on some layer which consists of some vector data in it, for example – vector masks, shape layers and so on.

So you will have to rasterize the layer containing vector data, and use the filters or tools on the same, thereafter.

Rasterization of Photoshop layers is really easy.

To do so, just choose the layer(s) for rasterizing, then visit Layer > Rasterize > Layer.
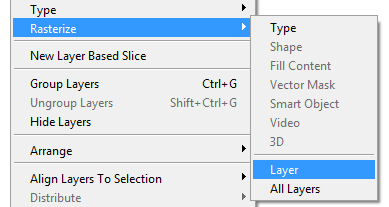
How to Rasterize a Layer in Photoshop?

And here you go.

Enjoy!

Categories
Education Fun & Entertainment How-To Guides Linux Mac Photoshop Tips and Tricks Windows

How to Add Border around an Image in Photoshop

Adding image border in Photoshop is quite easy after following the below steps.

  1. Just launch the Photoshop Software, and open the desired picture in it. Now to select the whole picture area hit CTRL + A (If you wanna add borders to some particular part to that picture, then you can choose the Photoshop Selection Tool).
  2. After performing the selections, visit Select > Modify > Border, and select the size of the border which you want to be created around that photo.

    How To Add a Border Around an Image in Photoshop

  3. Thereafter, select the border color from the Photoshop Color Palette, and visit Edit > Fill, to make the borders.

And you’re done with adding borders.

Enjoy!

Categories
Education Fun & Entertainment How-To Guides Linux Mac Photoshop Tips and Tricks Windows

How to Draw An Arrow in Photoshop

Most of the Photoshop beginners ask about drawing the arrows by using photoshop software.

Well, it is really easy to do so, for that you will have to use a line tool in a following way.

  1. Launch the Photoshop Software, Open the desired image in it, and and create a new layer
  2. Choose line tool as shown below in the picture (from the tool box)
    How to Draw An Arrow in Photoshop
  3. Then just select the Shape Layers, and launch the drop-down menu,
    then choose the Arrowheads as the Start or End. Then arrow head will be drawn to your desired point. Moreover, you can change the weight to 3px or more based on your desire.
    How to Draw An Arrow in PhotoshopHere you go! So you can now easily create the arrows in the Photoshop itself, as shown below in the picture.

    How to Draw An Arrow in Photoshop

Hope you enjoyed the tutorial.